Correct finger positioning is important in touch typing. Keys must be pressed with the relevant finger.
Finger Names and Position
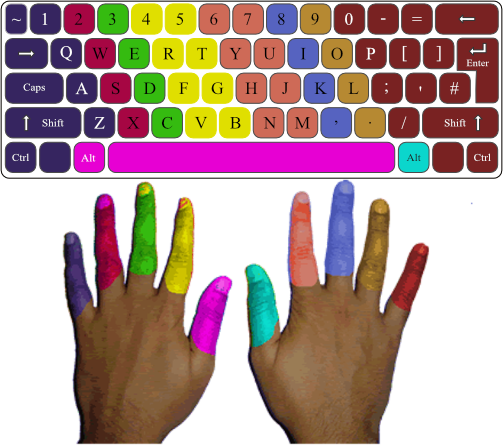
Place your hands over the keyboard and curl your fingers (do not bend your wrists). Your left-hand fingers should be placed over the A, S, D, and F keys, and the right-hand fingers should be placed over the J, K, L, and ; keys. These keys are considered the home row keys.
Left hand Home key
Little finger a
Ring finger s
Middle finger d
Index finger f
Thumb space bar
Right hand Home key
Little finger ;
Ring finger l
Middle finger k
finger j
Thumb
Anchoring:
Anchoring does not mean to keep a finger stuck on a key, anchoring means to keep a finger in very light contact with its home row key; during the early stages of learning keyboard, this is necessary for the brain to develop a sense of position for the hands and fingers. Eventually, as typing becomes a reflexed action and you become a more skilled typist, your fingers will learn to hover in position slightly above their home key positions.
In the early stages of learning to keyboard, take the time to say the finger names in order to learn them. As you gain confidence, stop this practice because it slows you down. Let your fingers learn the location and feel of the keys.
Ballistic Stroking:
This method of typing, which takes advantage of the light-touch electronic keyboard, requires less work and causes less strain.
In ballistic stroking you do not raise and lower your fingers to strike the keys. Fingers move inward toward your palm like they are running in place. This stroke uses fast strong muscles and allows them to relax between strokes. It uses only a fraction of the energy required by other techniques.
The fingers tap the keys quickly and cleanly. Pressing or heavily striking the keys puts unnecessary pressure on the delicate bones and tendons of the hands. Heavy striking can also damage your keyboard
see also:
typing